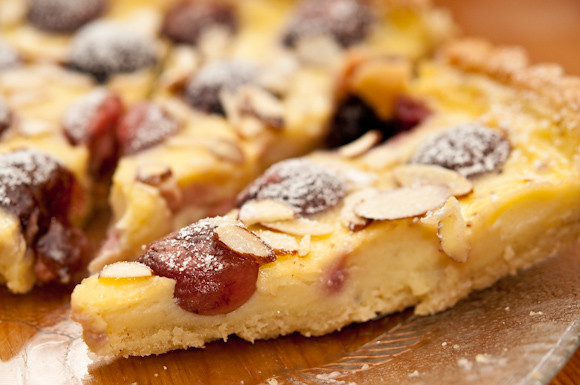
I actually never had the cherry clafoutis before, but this tart was surprisingly good! The crust was made with a basic tart recipe, which doesn't require for roll out, but using finger to shape the crust shell. I kind of like this method!
The filling texture was like in between pudding and custard. Warm, soft and flavorful. Clafoutis had immediately made to my recent fave list :)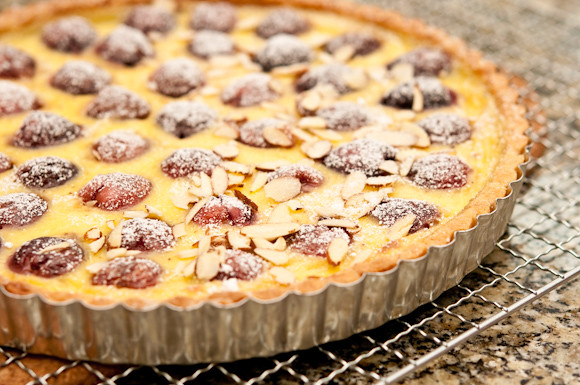

Showing posts with label recipe.pastries. Show all posts
Showing posts with label recipe.pastries. Show all posts
Sunday, July 04, 2010
Cherry clafoutis tart
Sunday, March 28, 2010
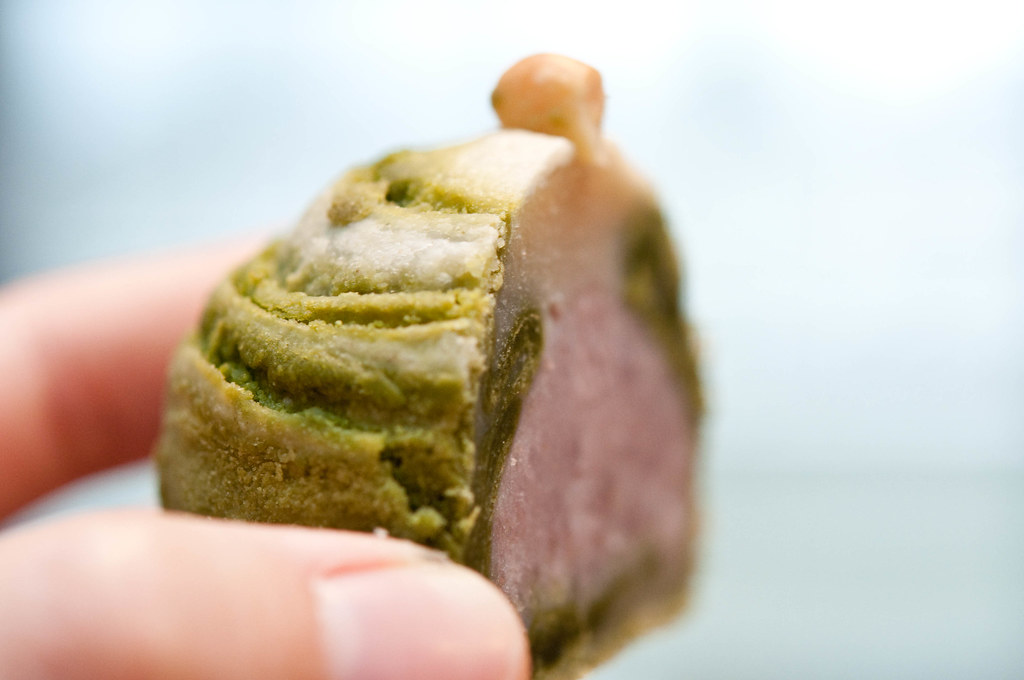
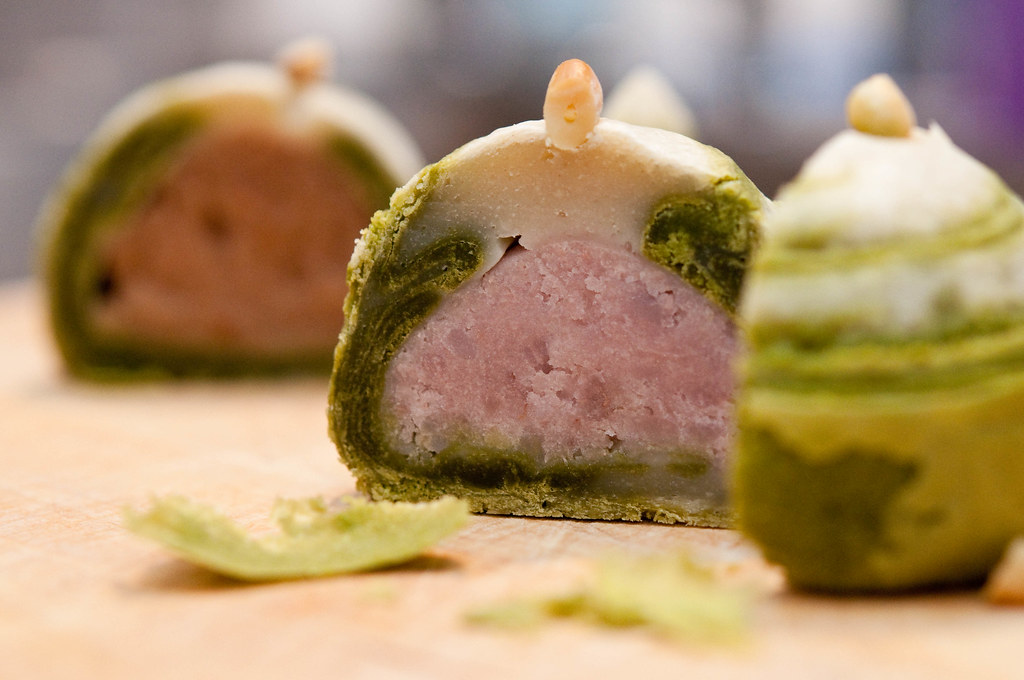
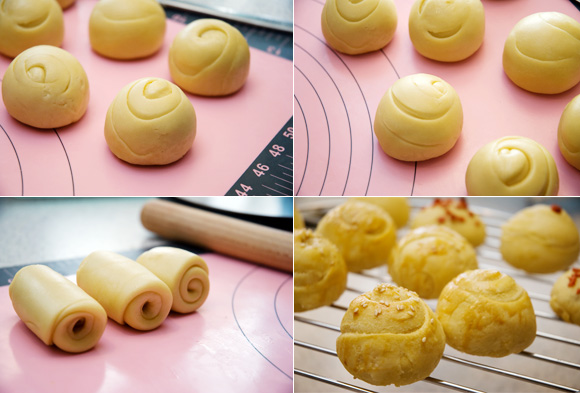
Little jade planets: matcha taro puff pastries
抹茶芋頭酥
Swirl mania! Don't they look like little planets?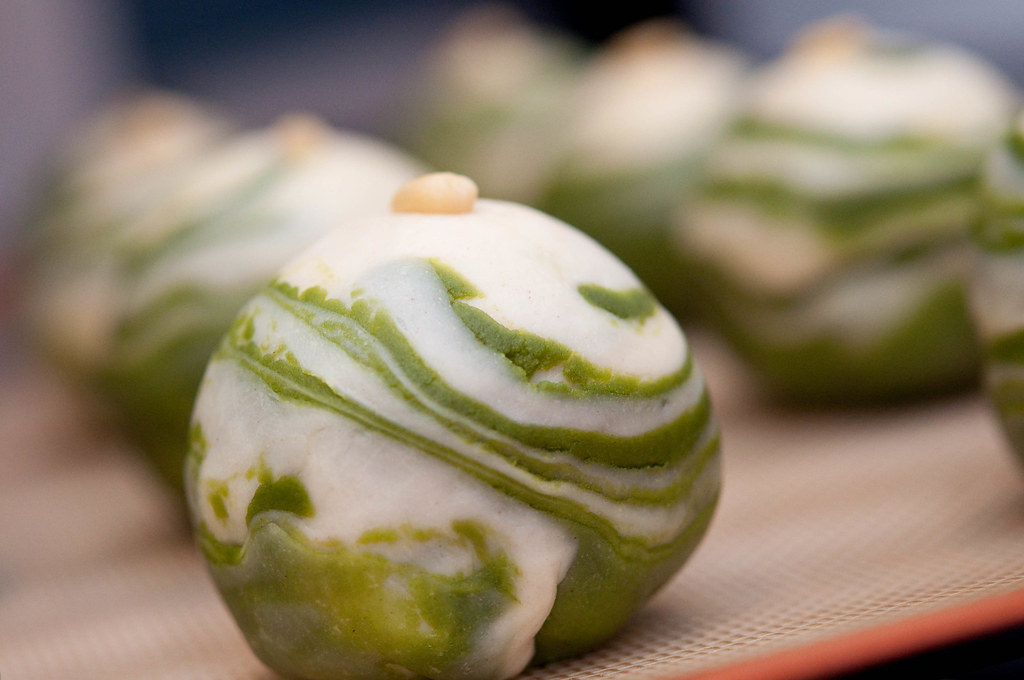
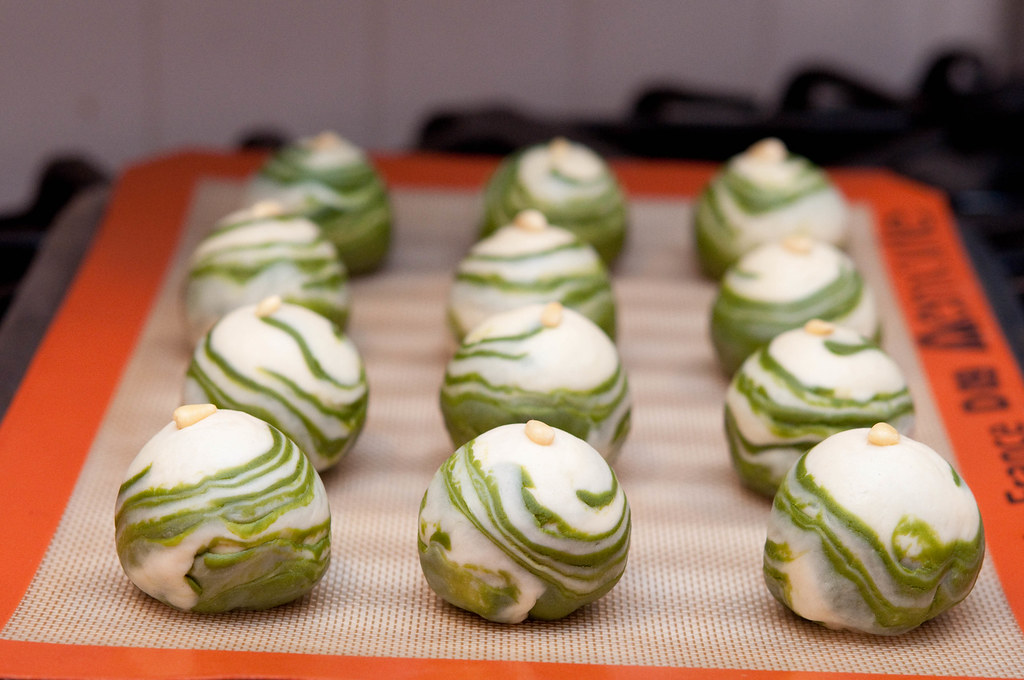
These are traditional Chinese puff/flaky pastry (酥皮), often stuffed with sweet fillings such as sweet bean paste and taro or savory fillings. In a way it's like Chinese steamed bun but with flaky crust...ha! These pastry varies from region to region throughout China, but when talking about these flaky pastries, two styles come in mind: the Su-style and Cantonese style. In the region of Suzhou, mooncakes are made of these puff pastry while these puff pastries are often stuffed with sweet filling in Canton region.
Unlike pâte feuilletée (French puff pastry), the Chinese puff pastry dough are quite easy to make and require not as much preparation time. See my another post onthe hard working pastries 勤勞的酥皮 1 : 蘿蔔絲酥餅 for process photos.
Matcha Taro Puff Pastry
1 dozen
- Recipe coming tonight , stay tuned! -
Sunday, November 15, 2009
A fancy pie 華麗派

The pie crust cutters are so cute that I just can't resist to get one and so I did XD I love this new toy!! So glad that I bought it even it's quite expensive ;p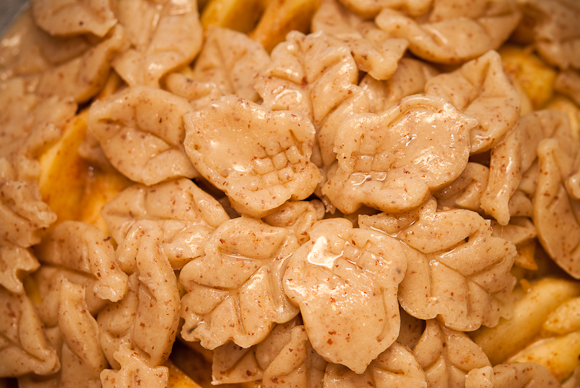
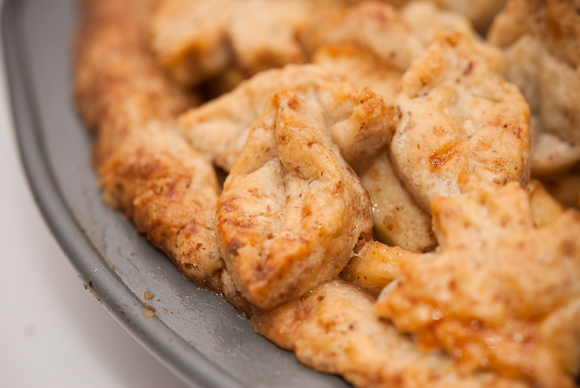
I am a sucker of new recipes. I tried different American apple pie every year, but still I haven't find a perfect one. They always came out too flaky that I can't even get the entire slice hold into a piece (or maybe this is what they suppose to be? Hmmm..). This recipe was disappointing, it tasted like a tart then a pie, so I am not going to share it this time. Oh well, at least I had fun with the pie crust!
Try the recipe from last year, it was awesome!
Old Fashion Apple Pie
Sunday, October 25, 2009
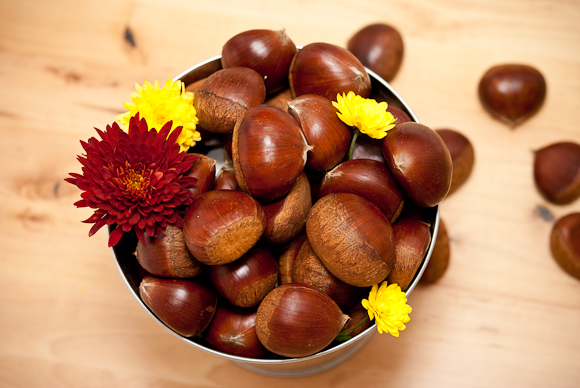
Chestnuts fever I: mont blanc + marrons glacés + chocolate chestnut soufflé
栗子狂熱: 蒙布朗 + 糖漬栗子 +朱古力 栗子梳乎厘
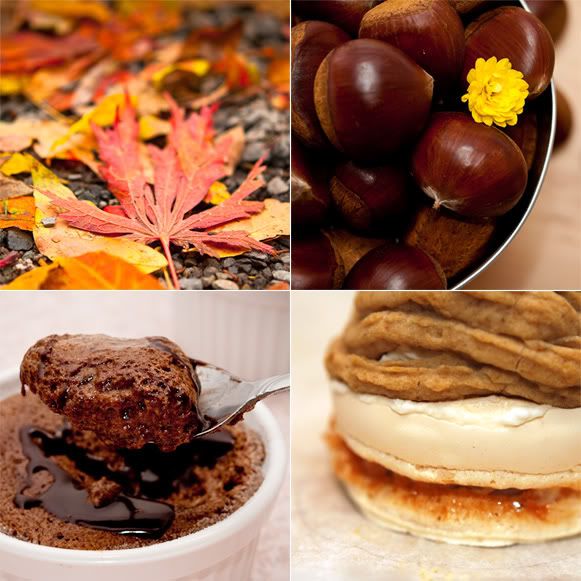
Have I ever mention my unexplainable crush with chestnuts?
As the cool autumn breeze arrive, my long-waited favorite fall ingredient is back! Last weekend, Mr. T and I were doing our normal weekend grocery shopping in Ranch99, and guess what? I saw CHESTNUTS! 2.99/lb!??!!! Really!? SERIOUS??! And they are in jumbo size too???!!! I immediately threw two bags of chestnuts into my shopping cart. Ha!!
This week is marrons glacés + mont blanc + chocolate chestnut soufflé!
*Also another favourite of all time: Lots of chestnuts pound cake marrons glacés
Now I finally understand why are marrons glacés so expensive. It's a very time consuming process! But these marrons glacés totally worth the time and effort I spent....SO GOOD!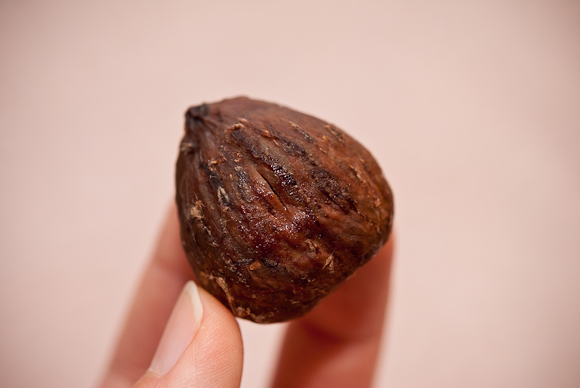
Hhmmmmm...the soft chestnuts texture, the subtle sweetness, the hint of vanilla scent...you have try it yourself to understand the magic of marrons glacés!!
Chestnuts, shells removed // 1 kg (2.5lb)
Granulated sugar // 500g
Water // 2 cup
Vanilla bean // 1
1. In a large saucepan, cover chestnuts with water. Bring to a boil. Boil 8 minutes. Discard liquid. Drain. Using a kitchen towel, rub off brown inner skins.
2. In a large saucepan, cook sugar, water and vanilla bean over low heat. Stir until sugar dissolves. Simmer 5 minutes. Add chestnuts. Increase heat. Boil 10 minutes.
3. Remove vanilla bean. Pour syrup and nuts into a large bowl. Let stand 12 hours. Return to pan. Boil 1 minute. Return to bowl. Let stand 24 hours. Repeat process 3 times until syrup has been absorbed.
4. Preheat oven to 150F. Cover a wire rack with parchment paper. Place chestnuts on wire rack. Bake in preheated oven with oven door open 2 hours or until firm. Remove from oven. Cool.
* notes *
1. The chestnuts didn't absorb all the syrup, so I just discard the remaining syrup.
2. Store in a container lined with waxed paper. Will keep up to 2 weeks.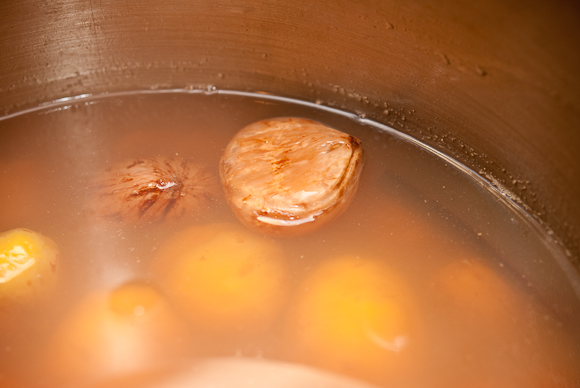
Shot after boiling on the first day. I kept some of chestnuts with cleaned skin.
Started with 1 kg of chestnuts ended up with 0.6kg of perfect chestnut after the whole process!mont blanc
If I have to pick one dessert that's truly capture my heart, then it must be mont blanc! Unfortunately, I haven't see any bakery selling mont blnac here, so sad /_\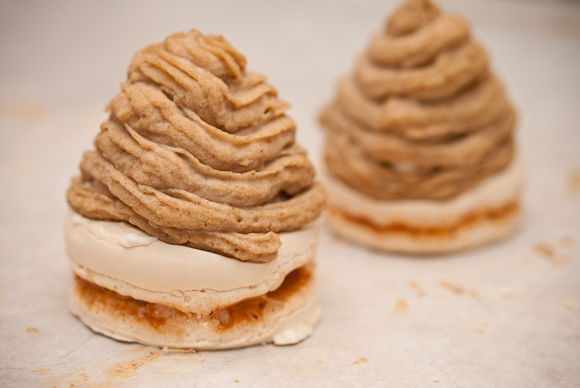
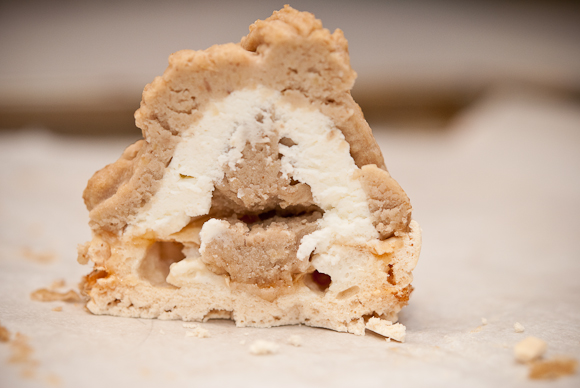
This version of mont blanc is composed of a delicate macaron-like meringue, with a layer of crème marrons on top of it, wrapped by the soft and creamy crème fouette and finally topped with generous crème chantilly aux marrons. A word to say: marvelous!
:Meringue:
Egg white // 105g
Raw sugar // 12g
Sugar // 160g
Powdered sugar // 30g
1. Beat together egg whites, 1/3 sugar and all the raw sugar in high speed until volume is formed. Add in 1/3 sugar and beat in medium speed for another 2-3 minutes.
2. Add in the remaining 1/3 sugar and beat in low speed until stiff peak. (Beat in lower speed will create a more smooth and less bubble meringue). Fold in powdered sugar.
3. Pipe the batter into small rounds(around 1.5" in diameter) on the parchment paper.
4. Bake 140C/284F for 10 - 15 minutes. When feet are formed, open the oven door and increase temperature to 150C/302F. Bake for another 30-40 minutes. Turn off oven when finished and let them sit inside the oven for a night.
*notes*
1. This meringue is a very delicious sweet treat with a delicate crust and a caramelized layer in the center. I almost ate all of them the day after!
:Crème Marrons:
Chestnut puree // 50g
Butter // 15g
Rum liquor // 2g
1. Cream the butter, then add in chestnut puree until fully incorporated. Finally fold in rum.
:Crème Fouette:
Heavy whipping cream // 120g
Whipping cream // 120g
1. Pour both cream into a bowl that sits on ice water. Beat until almost stiff peak.
:Crème Chantilly aux Marrons:
Chestnut puree // 400g
Milk // 60g
Heavy whipping cream // 200g
1. Place chestnut puree into a large bowl, add in milk bit by bit to form a smooth cream.
2. Add in cream all at once and use a whisk to combine. Place the bowl over ice water and beat until stiff peak.
3. Use a pastry bag and pipe on top of the Crème Fouette.
*notes*
1. I don't have the spaghetti pastry tip, so I use the star tip instead.
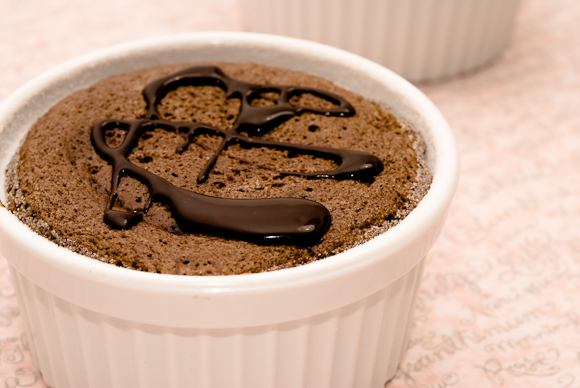
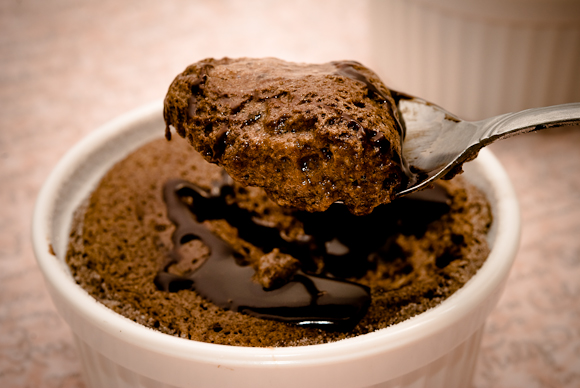
2. The original recipe didn't yield enough crème chantilly aux marrons, so I have no choice but to leave out the meringue.chocolate and marrons glacés soufflé with chocolate sauce
2 serving
revised from Gourmet Traveller
Dark chocolate, finely chopped // 60g
Marrons glacés, finely chopped // 10g
Egg whites // 3
Sugar, plus extra for mould // 30g
1. For chocolate sauce: combine chocolate, cream and Cognac in a heatproof bowl and place over a saucepan of simmering water, stirring occasionally until smooth. Set aside and keep warm.
2. Preheat oven to 180C. Melt chocolate in a heatproof bowl over a saucepan of simmering water, stirring occasionally until smooth, add marrons glacés and combine. Keep warm.
3. Meanwhile, whisk eggwhites until soft peaks form, add one-third of the sugar and whisk until glossy. Add remaining sugar, whisking continuously, until firm peaks form.
4. Add egg yolks to chocolate mixture and mix to combine (mixture will stiffen slightly). Fold one-third of the eggwhite mixture through chocolate mixture to lighten, then fold through remaining eggwhite mixture.
5. Divide among 2 buttered and sugared ramekins, smoothing tops and running a finger around edges.
6. Bake for 10-12 minutes or until risen and just cooked, dust with cocoa and serve immediately with chocolate sauce to pour over.
Saturday, October 03, 2009
月餅節 the mooncake festival
It's mid-autumn festival! Or I just called it mooncake festival since I am not doing anything else beside eating mooncake in North America!
傳統月餅: 白蓮蓉, 棗泥, 栗子
Traditional Cantonese mooncakes with lotus seeds, dates, chestnuts fillings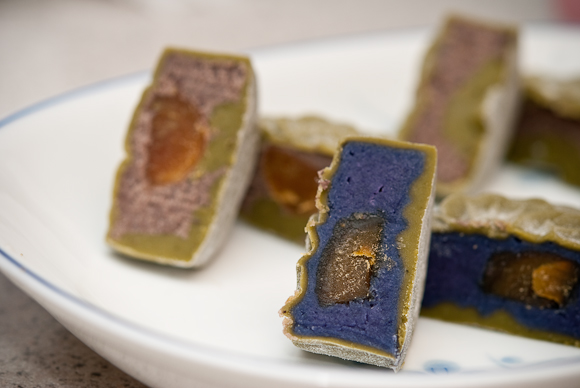
抹茶卑鄙(冰皮)月餅: 紫薯和紅豆味
Chilled matcha mooncakes with purple yam and red beans fillings. The yellow thing in the middle is salty egg yolk, the most important ingredient in traditional mooncake The Mid-Autumn Festival, also known as the Moon Festival, Zhongqiu Festival(中秋節), is a popular harvest festival celebrated by Chinese people and Vietnamese people (even though they celebrate it differently), dating back over 3,000 years to moon worship in China's Shang Dynasty. In Malaysia, Singapore, and the Philippines, it is also sometimes referred to as the Lantern Festival or Mooncake Festival.
The Mid-Autumn Festival is held on the 15th day of the eighth month in the Chinese calendar, which is usually around late September or early October. It is a date that parallels the autumnal equinox of the solar calendar, when the moon is supposedly at its fullest and roundest. The traditional food of this festival is the mooncake, of which there are many different varieties.
The Mid-Autumn Festival is one of the few most important holidays in the Chinese calendar, the others being Chinese New Year and Winter Solstice, and is a legal holiday in several countries. Farmers celebrate the end of the summer harvesting season on this date. Traditionally on this day, Chinese family members and friends will gather to admire the bright mid-autumn harvest moon, and eat moon cakes and pomelos together.
Source from Wikipedia
Being such a historic festival, of course there are stories/legends about it, check them out at wikipedia.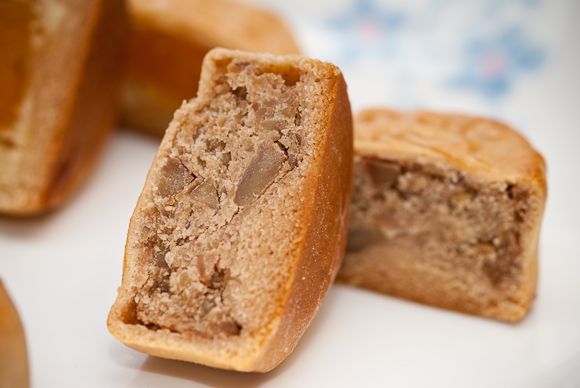
This is my first time on making the traditional mooncakes, it's actually easier than I thought. They aren't as flavourful as the store brought ones, since I used the precooked salty egg yolks. I will probably use fresh ones next year ;)
This year, I prepared purple yam, dates, chestnut, taro, red bean, mung bean, and the traditional lotus seed fillings. Purple yam wins my love this year. It's flavourful, it's soft and tasty, and of course the nice vivid purple color. Date is my second favourite! Homemade date filling is awesome, love it so much!
Tuesday, May 12, 2009
The chronicles of classic french pastry: pâte à choux
經典法式糕點歷險記: 泡芙
Time for trying out the "the Picasso of Pastry", Mr. Pierre Hermé's recipes!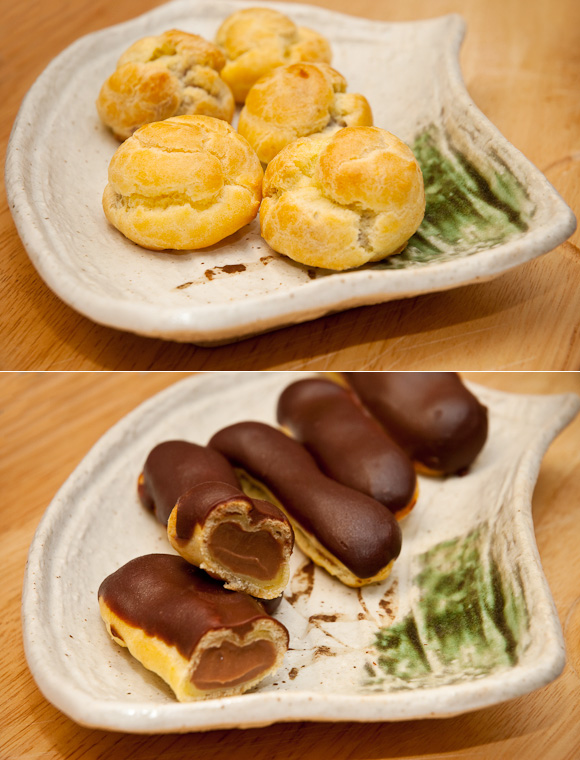
I am not totally unfamiliar with pâte à choux (Pastry base for cream puffs and eclair). In fact, cream puff is one of my most successful dessert items.
This time the result is awesome! I was totally impressed by the recipe. The choux pastry is crunchy outside and buttery moist inside, it's almost taste like 雞蛋仔 XD I think I ate almost half of the shells before I have the pastry cream ready....haha!
The éclairs are filled with chocolate pastry cream and finished with the chocolate glaze. This is going to satisfied any chocoholic needs :D
The macarons I had in LA were SO GOOOOOOOOOOOOD and so I am back to macarons. One day, I will make kicking ass macarons XD
Tuesday, December 09, 2008
puff pastries 2: Apple pâte feuilletée + Palmiers with black sesame
勤勞的酥皮 2: 焦糖蘋果派 + 黑芝痲蝴蝶酥
The Apple pâte feuilletée didn't turn out as what it supposed to turn out to be, holding me back from posting the recipe (even though it tasted pretty good!); Oh my, the palmiers were a blast! I almost want to cry when I had the first bite! Totally worth the effort :D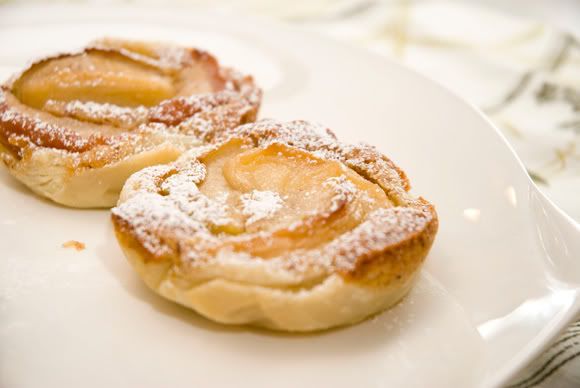
Apple pâte feuilletée
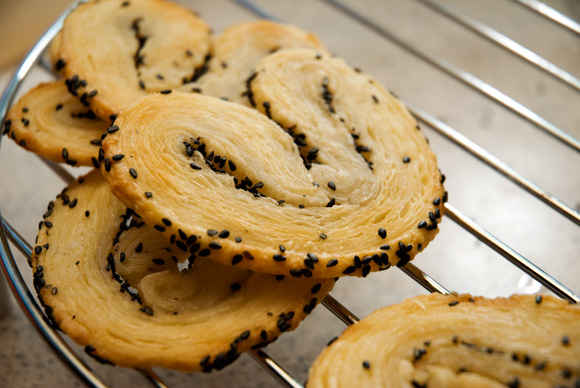
Palmiers with black sesame
one 9" pierecipe revised from Chocolate Desserts by Pierre Hermes
All purpose flour // 420g
Cold water // 185g
Salt // 2 tsp
Unsalted butter, melted and cooled // 70g
Butter(lock-in), slightly softened // 425g
1. Place flour on a working surface and make a well in the center. Dissolve the salt into the cold water and add this to the center of the flour well. Slowly start mixing the flour and the water together with circular motions and always working in the center so the water is absorbed by the flour and we work neatly. When they are mixed, add the melted and cooled butter.
2. Knead the dough for about 5 minutes. It will not be a super smooth dough at this point but don't worry because we will keep developing the gluten as we roll the dough. Wrap the dough in plastic wrap forming a rectangle that is approximately 6 inches long on one side. Refrigerate overnight.
3. To make the lock-in butter, cream the butter with the paddle attachment until smooth but still cold. Wrap in plastic wrap also forming a rectangle that is a bit smaller than the previous one. Refrigerate overnight.
4. The next day, pull the dough out of the refrigerator and roll to a rectangle that is about 1 cm thick (1/3 inch) and about 30x18 cm long (12x7 inches). Remove the lock-in butter out of the fridge. It will be harder than the dough but we need to have both right about the same consistency, so pound the butter with a rolling pin to soften it slightly.
5. Place the slightly softer butter on top of the right half of the dough rectangle. Fold the left side of the dough over the butter creating a packet. Seal in the edges. If necessary, press the dough down so the butter reaches every corner of the dough. We want the butter to spread evenly all over to create even layers. Place the dough on a sheetpan, cover it with plastic wrap and refrigerate for 2 hours.
6. Remove the dough from the refrigerator and roll it to a rectangle that is 3 times wider than tall, about 52x18cm (7x21 inches). Fold the dough like a letter, bringing the right third over the middle third and folding the left on top of it. Wrap in plastic and refrigerate for 2 hours. This was the first turn and make sure to mark it somewhere so you don't lose track of how many folds you have done.
7. Repeat this procedure 5 more times for a total of 6 letter folds, always rolling the dough with the open edges to the left and right of you. Refrigerate the dough after each turn. Use flour when rolling but brush off any excess after each turn to avoid getting too much flour on the dough. If the dough rips a bit and the butter is exposed, don't worry, try to patch it as well as you can but keep going. After all the folds are done, it will not matter that much.
8. After the last fold, refrigerate the dough overnight.
9. Sprinkle granulated sugar on top of a sheet of puff pastry. Fold it just like a fan. Take the left side and fold it in the middle and the same with the right side. Then fold these two against each other creating a fan. Roll this log in granulated sugar and refrigerate for 15 minutes until it chills some more.
10. Cut 1/2 inch pieces vertically. Press each palmier gently into granulated sugar and black sesame (both sides).
11. Place these on a sheetpan lined with parchment paper.
12. Bake in a 375F oven for 8 minutes. Turn the palmiers over and bake for another 8 minutes. Remove pan from oven and let the palmiers cool.
Sunday, November 30, 2008
the hard working pastries 勤勞的酥皮 1 : 蘿蔔絲酥餅
I finally try my first attempt on puff pastry! The result is great, except my arms were sore for 3 days...!! Pastry chefs have just become my new idols! How would they do that everyday? I bet they all have 6 packs!!
The Chinese puff pastry is so much easier than the pâte feuilletée, doesn't require chilling and you can use it right the way. Making the swirl is fun, maybe I will try making the Taiwanese mooncake next year.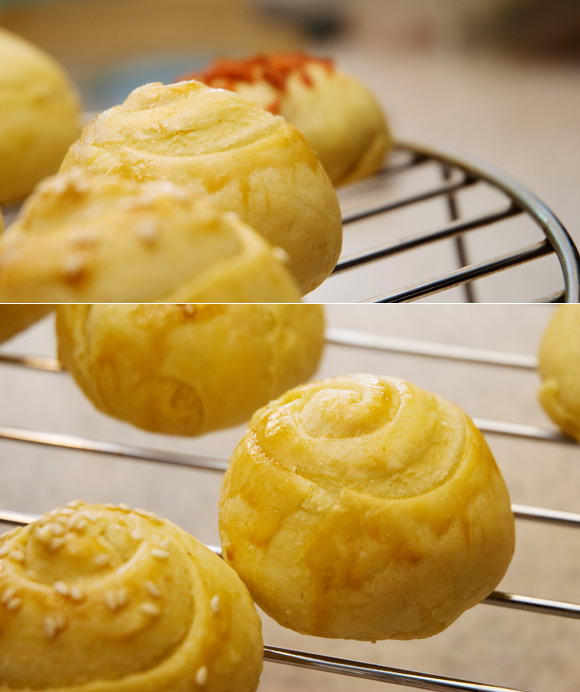
蘿蔔絲酥餅
8個
recipe revised from Eric 艾先生 camelking's house
: 外皮 :
中筋麵粉 // 420
糖粉 // 24
豬油 // 170
水 // 190
1. 中筋麵粉 + 豬油 + 糖粉,攪拌均勻。依序加入水。
2. 打到成糰放置鬆弛30分鐘。
3. 分切成30g一個。
: 油酥 :
低筋麵粉 // 270
豬油 // 130
1. 豬油 + 低筋麵粉,攪拌均勻。
2. 攪拌候用手抓勻。
3. 分成20g(個)。
: 內餡 :
蘿蔔絲 // 160g
鹽 // 少許
糖 // 2g
白胡椒粉 // 2g
水 // 100g
蝦米 // 適量
蔥 // 適量
辣榨菜 // 依個人口味
辣油 // 依個人口味
1. 將新鮮蘿蔔切絲
2. 放入滾水中煮滾即撈起 (不能煮太爛)。
3. 放入鍋中乾炒 (炒掉水分) 至泛黃。
4. {辣味} 乾蘿蔔絲 + 蝦皮 + 蔥 + 辣油 + 辣榨菜,拌炒。
{不辣} 乾蘿蔔絲 + 蔥 + 沙拉油,拌炒。
5. 依口味加鹽 + 胡椒。
6. 加糖拌炒均勻
:整合:
1. 外皮壓平,包入油酥,再壓成長條
麵糰用桿麵棍桿開,再將作法(3)的油心放入水皮中間,包起後揉捲成長條狀,用刀分切成3段,再將酥皮立起,放入冰箱冷藏15分鐘備用。
(5)取出酥皮後用桿麵棍桿開,捲起成長條狀再次桿開,重複2次後捲起,用刀再分切成4等份,依序做好其他2段,共可完成12份油酥皮。
*notes*
1. 紅色一點點的是bacon bits,因為快過期了,所以隨手就加上去了!
Thursday, November 27, 2008
thanksgiving: Old fashioned apple pie 美式蘋果派
I made my first apple last year, not bad, but I was not too happy with it. The pastry was so flaky that it didn't stick together.......then I tried this recipe, damn, still the same! Even thought the slice still didn't hold into a piece during serving, but I like it better :) Good pie!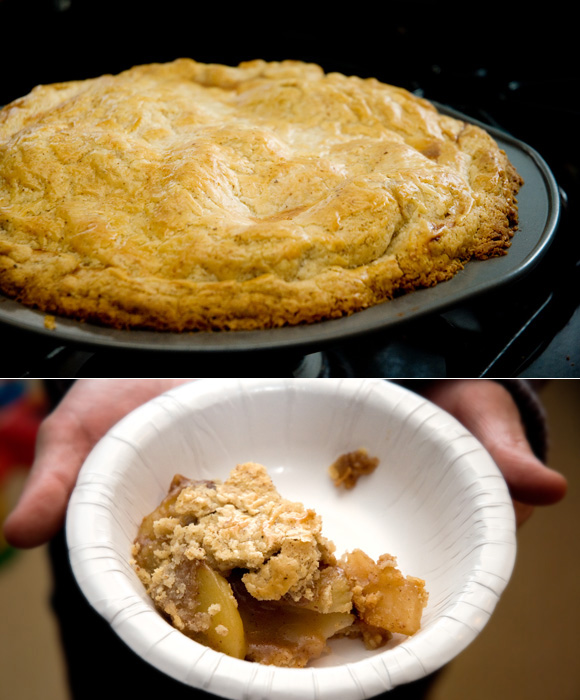
Old fashioned apple pie
one 9" pie
recipe revised from Simply Recipes
: Crust :
All-purpose flour, plus extra for rolling // 2 cups
Finely ground almonds or almond flour (or substitute with 1/2 cup flour) // 1/2 cup
Unsalted butter, cut into 1/2 inch cubes, chilled in freezer for at least 15 minutes //16 tbsp (2 sticks)
Salt // 1 tsp
Brown sugar // 1 heaping tsp
Water, very cold // 3 to 6 tbsp
: Filling :
Sugar // 2/3 cup
All-purpose flour // 3 tbps
Ground allspice // 1/4 tsp
Nutmeg // 1/8 tsp
Cinnamon // 1/2 tsp
Apples, in 1/4~1/2" thick slices // 3~4
Brandy // 1 1/2 tbsp
Vanilla extract // 1 tsp
: Egg wash :
Egg yolk // 1
Cream // 1 tbsp
1. In a food processor, combine flour, almonds, salt and brown sugar, pulse to mix. Add butter and pulse 6 to 8 times, until mixture resembles coarse meal, with pea size pieces of butter.
2. Add water 1 Tablespoon at a time, pulsing until mixture just begins to clump together. If you pinch some of the crumbly dough and it holds together, it's ready, if not, add a little more water and pulse again.
3. Remove dough from machine and place on a clean surface. Carefully shape into 2 discs. Do not over-knead the dough! You should still be able to see little bits of butter in the dough. These bits of butter are what will allow the result crust to be flaky. Wrap each disc in plastic wrap and refrigerate at least 1 hour.
4. Position rack in bottom third of oven and preheat to 375°F.
5. Combine sugar, flour and spices in large bowl. Use your hands and mix in the apples so they are well coated, then add brandy and vanilla extract.
6. Remove one crust disk from the refrigerator. Let sit at room temperature for 5-10 minutes. Sprinkle some flour on top of the disk. Roll out with a rolling pin on a lightly floured surface to a 12 inch circle; about 1/8 of an inch thick. As you roll out the dough, use a metal spatula to check if the dough is sticking to the surface below. Add a few sprinkles of flour if necessary to keep the dough from sticking. Gently fold in half.
6. Place on to a 9-inch pie plate, lining up the fold with the center of the pan. Gently unfold and press down to line the pie dish with the dough.
7. Spoon in apple filling, mounding slightly in center.
8. Roll out second disk of dough, as before. Gently turn over onto the top of the apples in the pie. Pinch top and bottom of dough rounds firmly together. Trim excess dough with kitchen shears, leaving a 3/4 inch overhang. Fold dough under itself so that the edge of the fold is flush with the edge of the pan. Flute edges using thumb and forefinger or press with a fork.
8. Stir yolk and cream in small bowl to blend. Brush over top of pie. Cut slits in top crust to allow steam to escape.
9. Bake pie until crust begins to turn golden, about 20 minutes, then reduce heat to 350°F. Tent the rims with aluminum foil or a pie protector if the edges are browning too quickly. Bake until crust is golden and juices are bubbling, anywhere from an additional 30 to 45 minutes, depending on the type of apples you are using. Transfer to rack; let stand 1 hour. Serve pie warm or at room temperature.
Wednesday, November 21, 2007
apple & pear tart 本來無一物,何處惹 pie tart?
不經不覺已經是十一月尾,轉眼間就入冬了。冷颼颼的寒風狠狠地拍打我的小腦袋,我就知道現在已是Pie Tart兄弟橫行的冬天了!試問又有誰能在寒冷的天氣抵抗熱呼呼暖烘烘的誘惑呢? 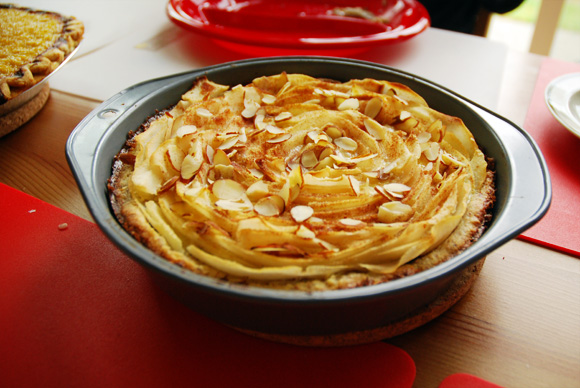
Pear Almond Tart :: 鳴謝Uncle幫手片薄片!係咪好靚呢?嘻!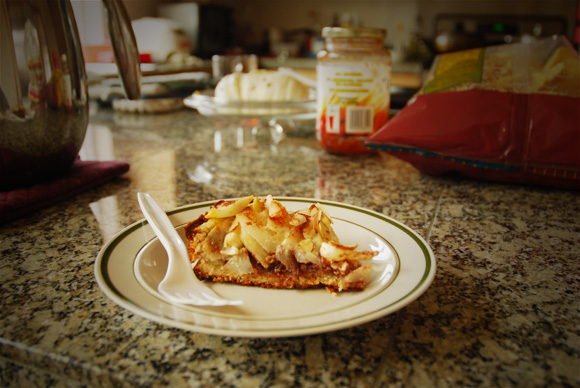
Pear Almond Tart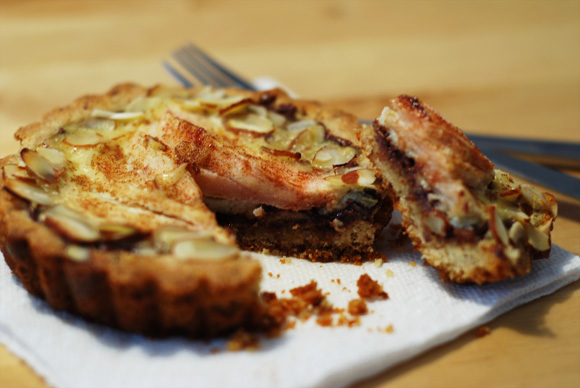
Apple Almond Tart
前幾天做了最愛的杏汁蛋白,把剩下的杏渣加了一些入餡料,效果出乎意料地外好!很香南北杏味,跟Pear tart意外地合得來。下次可以試試拿來做曲奇,不知道會怎樣呢~
Subscribe to:
Posts (Atom)