I have to admit I am an idiot.
I was too excited about making mooncake fillings and end up making way too many fillings! Ha! So this week is all about using all these different leftover fillings.
Piggy stuffed buns! Aren't they super duper cute? I stuffed them with taro fillings
"You are so cute!"
"You too ♥"
*kiss kiss* 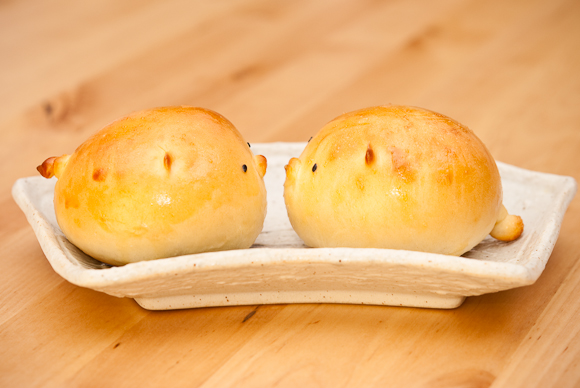
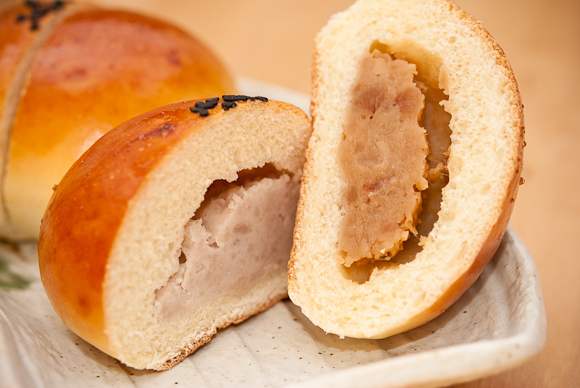
Sweet bun stuffed with taro and date fillings, yummy breakfast! Approved by everyone in my team at the office :)Sweet stuffed buns
12 medium size buns
Taro filling:
Taro // 1 lb
Coconut milk // 3 tbsp (Optional)
Sugar // 3 tbsp
Butter or vegetable oil // 2 tbsp
1. Peel the taro and cut into chunks(You can also buy the peeled ones). Steam the taro over simmering water for 20 minutes or until it's soft enough to be mashed. Mashed the taro.
2. Add in the mashed taro in a saucepan over low heat, stir/fold occasionally until dry a bit. Add in coconut milk and continue to cook until fully absorbed.
3. Add in sugar, stir/fold to mix into the mashed taro. When the sugar is dissolved, add in butter or vegetable oil, mix well. Set aside and allow the filling to cool.
Dough:
Bread flour // 280g
Cake flour // 70g
Dry yeast // 7g
Sugar // 50g
Salt // 7g
Powdered milk // 7g
Unsalted butter // 35g
Eggs // 58g
Water // 140g
1. In a large bowl, combine everything except butter. Beat until well blended using a stand mixer with a dough hook attachment. Add in butter and knead until dough is smooth and elastic. Shape into a ball. Place dough in a greased bowl. Cover, and let rise in a warm place for until double it size.
2. Roll the dough into a ball (50g each). Let rest for 20 minutes.
3. Flat each dough using your palm, place a spoonful of filling, wrap it up to form a round bun. Seal the ends underneath. Let rise for 60 minutes or until 2 times larger in size.
4. Brush egg yolk or milk wash on the dough. Bake 190C/375F for 12-15 minutes or until golden in crust.
: Note :
1. You can fill these buns with different fillings: red bean, chestnuts, mung bean, dates, yam or even pumpkin (probably the easiest/cheapest during this time of the year).
2. The bread turns out perfect! Light crust with soft texture inside and these buns were still soft after 4 days.
3. You can also freeze them and throw them directly in the oven 275F for 15 minutes.甜麵包
12 圓型麵包
: 棗蓉餡 :
紅棗 // 250g
糖粉 // 200g
麵粉 // 10g
牛油/菜油 // 2 tbsp
1. 紅棗洗凈浸過夜,去核,上籠大火蒸10分鐘(蒸爛即可),過篩去皮,壓成泥狀。
2. 棗蓉禾放入鍋中,以小火翻炒收乾水份,加入糖粉,繼續翻炒至完全吸收。糖完全融化後加入牛油翻炒至均勻。放涼待用。可加入麵粉翻炒以便操作。
: 芋頭餡 :
芋頭 // 1 lb
椰漿// 3 tbsp (Optional)
糖// 3 tbsp
牛油/菜油 // 2 tbsp
1. 芋頭削皮切成塊狀或片狀上籠大火蒸20分鐘 (蒸到可以輕易戳入的程度),趁熱用叉子壓成泥狀。
2. 芋頭泥放入鍋中,以小火翻炒收乾水份,加入椰漿,繼續翻炒至完全吸收。
3. 加入糖拌合。糖完全融化後加入牛油翻炒至均勻。放涼待用。
: 麵包體 :
高筋麵粉 // 280g
低筋麵粉 // 70g
乾酵母 // 7g
糖 // 50g
鹽 // 7g
奶粉 // 7g
全蛋 // 58g
無鹽牛油 // 35g
水 // 145g
1. 將所有材料除牛油外混合,搓成麵團,然後加入牛油,把麵團搓至光滑不黏手,撐開呈薄膜狀。
2. 麵團搓好後,發酵 60-90分鐘 用保鮮紙蓋上(發大2倍)。
3. 完成發酵後,排氣,將麵團分割成 50g 的麵糰,然後滾圓,鬆弛 20 分鐘。
4. 將麵糰用手掌略為壓平,包入適量甜餡料,收口壓緊朝下放入焗盤中作最後發酵大概60分鐘
5. 表面塗上蛋汁,用桿棍沾水壓上黑芝麻,放入己預熱焗爐用200度焗約 15分鐘。
I've also made the Chinese sweet buns version of the piggies, but I was being idiot again, totally messed them up while steaming...........T_T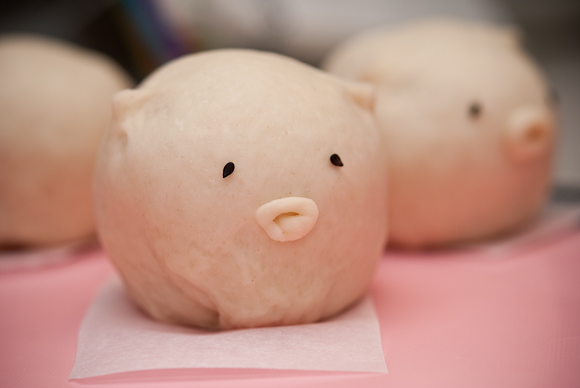
胖du du豬仔蓮蓉包
The cutest fatty piggy buns XD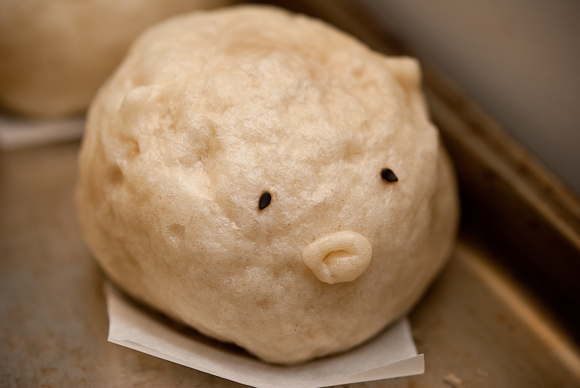
偷懶之過沒有用毛巾!(用毛巾包著蒸籠可以避免水滴在包面做成粗糙的表面),所以蒸完後變成豬頭丙蓮蓉包!可憐的豬豬,我對不起你們!
My fault on being lazy not using the towel (Using a towel to wrap underneath the towel can prevent water drops from the cover. Look here for an example photo), and so......the cutie piggy buns became the victims of domestic violence!
See the black sesame buns for recipe.
Saturday, October 10, 2009
Mooncake leftovers: Too cute stuffed buns
月餅餡消耗戰: 棗蓉/竽頭小麵包
Subscribe to:
Post Comments (Atom)
you know, my friend loved those piggy buns photos xD
Those are the cutest piggy buns EVER. Any tips for shaping them?
These look delicious! I love the photo of the two piggies facing each other!
Oh these are soo adorable! I need to try to make them sometime. And maybe some other cutesy animal shapes too.
These are so, so, so cute! I feel like pinching the piggies cheeks.
Amiee: My friend's kiddo love them too!
tofugirl: I just used my fingers to press and pull out the ears. Roll up a tiny stripe of extra dough, form a circle and stick it to the dough as mouth.
Jesscia: They are in love ♥
kirbie: Make it make it make it! I did tried making them into rabbits and elephants, but they aren't as cute as theset ;)
Jo: Haha yup! I had a lot of fun poking the piggies faces too!
these are SO adorable! I'm going to have to try it with different fillings though. Taro is too expensive for me, lol
Adorable work!
Thanks for the recipe.
I made it for my mum, and they basically ran out the door so she made me make another 3 batches! thats 7 hours slaving in the kitchen hehe.
We also tried stuffing them with a coconut/sesame seed mix and another with pork floss. They turned out really well :)
TabzChewy: Really? How much is taro selling over your place??? They are like $1.xx/lb here! You can stuff them with anything, even pork or chicken!
Susan: Wow!! 7 hours making buns? WAHHHHHHHH! Coconut/sesame seed mix sounds awesome!
This is such a cute idea! The taro filling looks delicious!
The little piggies are soo kawaii~ How many buns did you make using this recipe? And when you say xx grams of egg, you mean beaten/ I never made anything with metric measurements and converting to cups and tablespoons ar so tiring...but I must sacrifice it for the piggies! ^-^
these were great! i made cats instead of piggies by slashing whiskers into the bun with a knife. so fun!
the filling i made up using a tin of bamboo shoots whizzed in the food processor with some soy sauce, grated ginger and chopped coriander. yum!
I just stumbled on your blog and I had to comment on your taro piggy buns, they're so cute! Would you mind if I shared you on my blog?
comment | post | menu